

How To Repair Volume Buttons On A Dell Latitude E7440

My ICT shop owner friend Chafik asked me to help him checking on a Dell P40G laptop that no longer worked with the original power supply. As before long the adapter was connected to the laptop it went into protective manner because of the short circuiting mainboard that also produced smoke and some overheating components. And I helped him to detach the laptop and find the culprit.

These Dell ability adapters are different in the fashion that they also accept an extra wire connection to check on the bombardment pack. And other universal adapters lack this advice wire to the battery pack and unremarkably therefore won't charge the pack because of it. This P40G Dell adapter also has a white led build into the cable plug that only works when the short circuit is gone. And it needs to exist reset by re-plugging in the power cord to escape the protective mode the adapter was in.

Above photos bear witness the original Dell adapter that came with this laptop and shows the white led that only is active after the trouble is solved! Disassembling the laptop was doable but took some time to open the thinner made construction since no data was establish online on how to exactly do that.
After all screws on the bottom side were removed nosotros simply needed to push the keyboard upward, just first also remove the top rectangular frame with the text Latitude E7440 on information technology that covered the keyboard screws that were under it.

And next photo shows the mainboard bottom side.

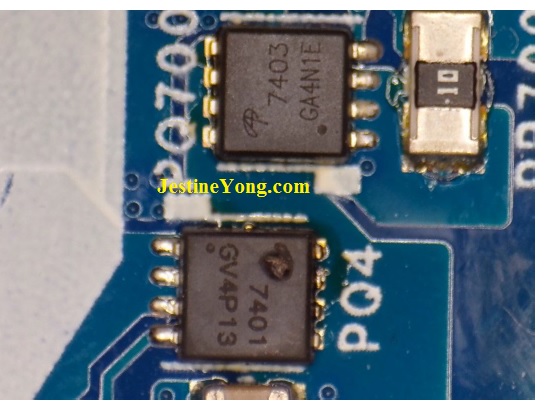
Because the original adapter kept going in protective mode we used another universal adapter to find the spot on the mainboard where the rut was generated and the fume was coming from. This way we found the components that overheated. Two north-channel mosfets type AON7401 and 7403. With marking PQ4 and PQ700 on the mainboard.

We removed both mosfets that clearly where defect and needed to be replaced. The AON7401/PQ4 is a 35A 30V mosfet and the AON7403/PQ700 a 29A 30V mosfet. We also used a special thermal camera to check the spot that generated heat. Next photograph shows a close-upwards on both mosfets taken with a digital microscope camera. Information technology conspicuously shows a damaged and overheated 7401 mosfet.
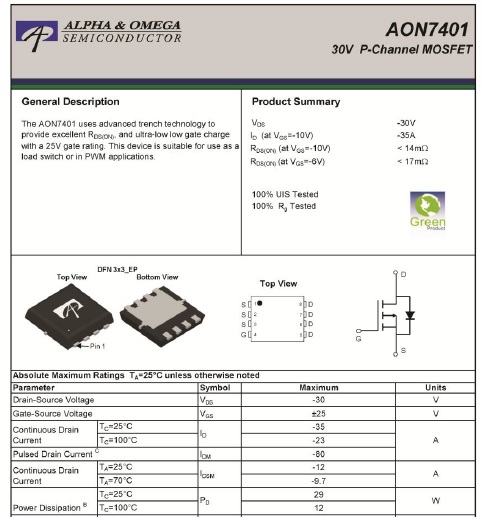
Below shows some info on the datasheets of both mosfets.

Merely replacing both mosfets sadly didn't assist as both mosfets were destroyed right later we connected our universal adapter again. So they were not the cause of the problem and we started measuring where the real reason was. Information technology turned out that the capacitor side by side to PQ700 was completely shorting. And this also caused shorting all other capacitors on both sides of the mainboard! Look at the dark-brown coloured capacitor on next, with the special microscope camera taken, photo. The culprit is marked by an orange arrow.
But after this capacitor was removed the consummate shorting of the mainboard was gone. What made it more difficult to detect this capacitor and its position in the mainboard schematic was that even although we besides found the correct laptop circuits, none of the capacitors on the mainboard were numbered! And about all capacitors on both sides of the mainboard measured shorting the mainboard because of this single shorting capacitor on the mainboard bottom side. See likewise that photograph with the mainboard label marker on it.

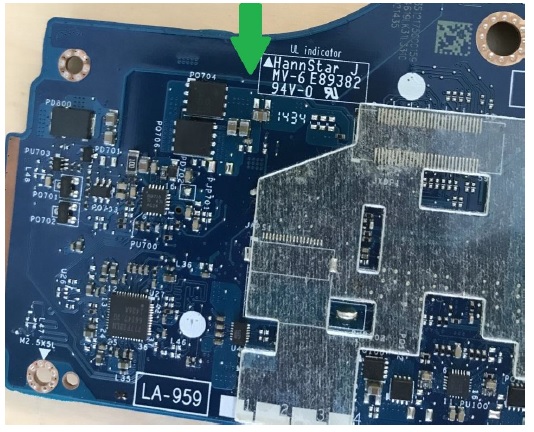
Higher up photo of the labelled mainboard top side where mosfets PQ704 and PQ706 testify on their right the likewise shorting (light-green arrowed) capacitors considering of the mentioned culprit capacitor next to position PQ700 on the bottom side.
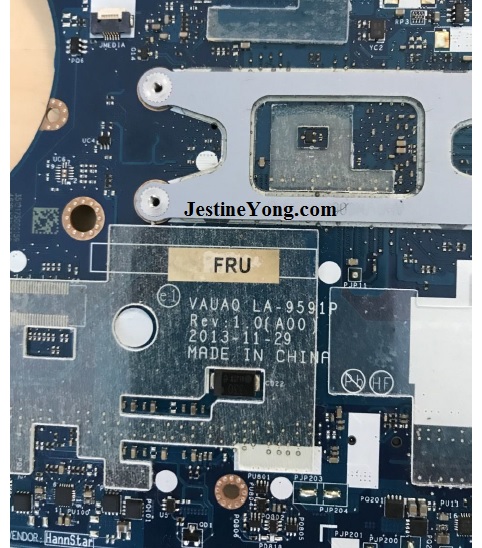
To a higher place photo shows the mainboard superlative side characterization marking.
Conclusion: afterwards the shorting capacitor was replaced followed by AON7401 and AON7403 mosfets , the laptop was fixed and ready and the original Dell adapter worked and likewise charged the bombardment pack. And later on some boosted tests my shop owner friend'due south work was done!

Albert van Bemmelen, Weert, The Netherlands.
Please give a support by clicking on the social buttons below. Your feedback on the mail service is welcome. Delight go out it in the comments.
P.S- If you enjoyed reading this,click here to subscribe to my blog (free subscription). That way, you'll never miss a mail. You can also forward this website link to your friends and colleagues-thanks!
Note: You can read his previous repair article in the below link:
https://jestineyong.com/vibrograf-b200-mechanical-spotter-calibrator-repair/
Likes (78) Dislikes
 (0)
(0)

How To Repair Volume Buttons On A Dell Latitude E7440,
Source: https://jestineyong.com/dell-latitude-e7440-p40g-laptop-repair/
Posted by: reynoldsrefort.blogspot.com
0 Response to "How To Repair Volume Buttons On A Dell Latitude E7440"
Post a Comment